Thursday 22 March 2012

T shirt scarf

unfortunately this is not an original idea but I still thought it was pretty cool. I found an old t-shirt that had some holes in it and decided to make a scarf. I had seen tutorials on-line (for an example look Here)

basically all you need is an old t shirt (preferably an xl although mine was a men's large and it worked fantastically), scissors and a flat surface . I used my sewing machine but its definitely not a needed. also if you can find a t shirt with no side seams that will also work better for a longer scarf. otherwise look at the tutorial I mentioned before for how to use one with seams.

lay the shirt down flat on your surface
Cut the bottom hem off


cut it just under the arms

next cut your shirt into stripes leaving a one centimetre piece connected on one side

Now gather you scarf together on the side that's still attached and stretch your loops


The loops will curl in on themselves


If you don't have a sewing machine/don't want to use one the at this point simply take a scrap piece of material and tie the loops together to keep the shapes. I decided I Wanted to sew a  piece to cover the join.

I took a rectangular scrap and edged/hemmed it together
sorry for the blurry shot

When I had hemmed my rectangle I wrapped it around the join with the right sides together and sewed

when it was connected I simply turned it the right side out. 
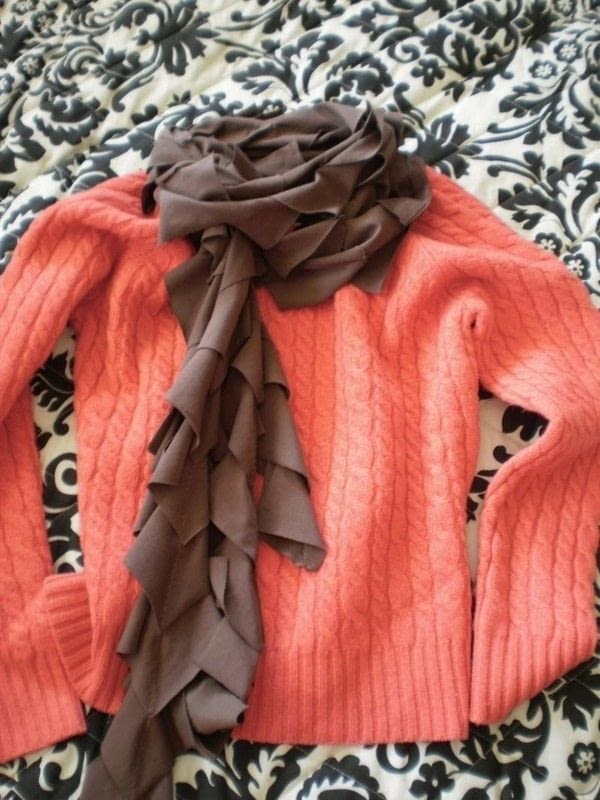
this is the final result

my husbands not to sure about it but I like it , its different :)

for more ideas check out my Blessed Life who gives you 10 different scarf ideas to make with t-shirts.
I'd like to try making one like this:

or this next:


spread the joy

How to Nest for Less

Monday 19 March 2012

Super Shopper:)

While at the shops this weekend I realised I needed a new pair of 'summery' shoes to get me through the rest of the season. Last Sunday at church I broke a pair of Sandals and the shoes I had on were falling apart at the seams (literally) and had almost been walked through. My other sandals were headed along the same path so we stopped in at Ackerman's to see what they had. Now I realise the shoes in the picture below are not summery but I'd also been looking for new boots for winter (although was not planning to buy them right now) and was having a look at the selection. These were the last pair on the shelf and happened to be in my size. They were marked down to N$ 99.99 so I thought what the heck and took them.


when we went to pay the lady rang them up and they were actually N$ 39.99..... SCORE!!! 
I also found an awesome pair of knitted UGG type boots for N$ 20.00... Yup, I bought them too :)

what's nice about them is that they have buttons on both sides so you can roll them up or have them folded down.
BUT
the best shopping score of the weekend has got to be this:

We got a clicks cash back voucher and I needed some new eye-liner . It was marked N$19.99 on the shelf but when we rang in up it was N14.95. the cash back Voucher was for N$14.73 so that eye pencil cost me
20c!!!


Not a bad weekend of shopping if  I do say so myself :)


Monday 12 March 2012

Guest room freshen up


A while ago I wrote here about how we did some home improvement and my Mom helped me make some curtains for our spare room. I promised to share some pictures and completely forgot! Without Further ado here we go :
I also made a pin board to match said curtains and shared my tutorial for that here

I made it to jazz up our very boring desk area which looked like this:

Well I FINALLY Remembered to by double sided tape  attached the pin board to the wall ! now our desk area is looking a little more complete


To corral all my pens and glue sticks I cleaned out some tins and printed some scrapbook paper off the net (I can't remember where I got it from)


Here is a close up of the (still empty) pin-board. The butterfly comes from the beautiful flowers my hubby got me for my birthday this year


The sleeper couch is covered ,for the moment, with a sheet. The long term plan is to recover the couch in denim . I made the pillow case cover with another remnant of material. Its just a simple envelope cover which took about 15 minutes to make. As the room is so small we only pull it out when we have guests just to make the room more functional for us.


 I still have some tweaks I'd like to make to the space but for now its functional and a looks a lot better than it did. The walls still need to be painted and repaired from the water damage we had before moving in and I'd like to recover the couch and add in some more denim accents .
for now though I'm Happy :)


linking up with


How to Nest for Less

Friday 9 March 2012

Savings bottle and label Tutorial

I decided that I wanted to start a little extra savings project on the side, for fun things. While reading through the net I saw an idea about picking a coin denomination and every-time you receive one of those coins to save it. I really can't remember where it came from so if it was your idea let me know so I can give you credit. I decided to pick N$ 5. the dilemma was where to store all the coins. 
Hence the picture below:


My hubby likes to drink 'real' coffee. So it means there are some of these bottles around. They have wonderful sealing lids so I keep them to decant things like bags of spices/salt or popcorn. the labels peel off really easily and what doesn't peel of is gone after running it through the dishwasher. Without the label the bottle is just plain glass. A little boring for me, so I decided to make a label. I downloaded one of the pattern pieces on Sprik Space , who I mentioned here
I chose the Circles Pattern in chocolate brown


After downloading the image I opened it in Photoscape. For those of you looking for a user friendly Photo editing Software now that Picnik is closing I can highly recommend this product. you can find a link to the download of it in this post
It looks like this in the editor tab.


After selecting the image I wanted to work with from the side bar I cropped it into a rectangle to make it more of a label shape. This is done by selecting the crop tab and cropping freely


your label should look like this:


once again using the editor tab I added an object :namely a rounded box

Be sure to change the background colour of the box to match your required theme. I made mine white


To add the text, stay in the objects Tab and Select the Capital T text tool


it will open a composition editor where you can edit the size/font/colour of your desired text. when you are done click OK and it will be added to your picture. You can move the text around to position it where you want it.


when you are happy with your design click on the photo and objects key (found in the objects tab). this will group your objects together to make one picture. Click on Save and select Save As to select where you would like to save your edited picture.


Save the picture and make sure you select a value of 95 % or higher. This will ensure the quality of the picture is not compromised.


Open your picture in your photo Viewer (I use windows picture and fax viewer) and print to your desired size.I wanted mine to wrap around the bottle so I used a full A4 size print.


Cut your label out and check it fits where you want it to be, trim if needed :


Attach it to your bottle with your chosen adhesive:


overlap the ends and secure


Voila... your own personalised Label

For a little before and after:

now to start saving :)
Donations anyone?


 http://howtonestforless.com/wp-content/uploads/2011/09/btn-Feature-Nest-for-Less-125p.jpg