Thursday 28 June 2012

bathroom dreaming

To follow up on the kitchen post from earlier this week, let talk bathrooms! we will have two (well one and 3/4) bathrooms in our new place. As everything will be so open plan and we'd like to keep the flooring as consistent as possible the 'main bath' has been cause for some debate.
we have decided to keep the main stuff (toilet/sink/bath) white as we feel its the most classic choice and won't date.
plus its the easiest colour to accessorize. While W and I have many things in common our decorating styles tend to differ. I love things to be bright and like and slightly modern , he likes a more muted neutral traditional look. Our house at the moment was our first attempt at combining our stuff and style. I love our little house but its got too much brown action in it at the moment and in the new house I want to mix it up a little bit more.


I'd love to try out an interesting paint treatment like the photo above 

I LOVE this shower curtain but know it will be nixed ... a girl can dream ;)

the rest of the bathroom will be neutral enough to mix things up but not so neutral to be boring. We'll be going for a mix of grey/white/brown for the tiling
with this kind of tile for the shower floor/accent
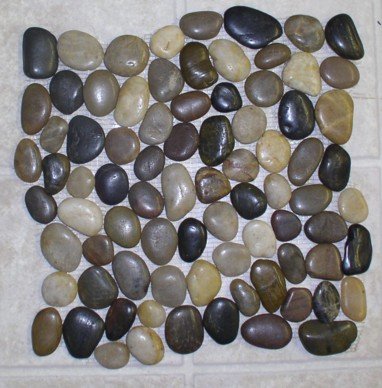
We liked one where the pebbles were a bit flatter/closer together but with the colour variation like above.
more like this:

we will probably use white tiles within the shower and as a splash back.

the rest of the styling remains to be seen but I'm looking forward to getting creative :)

Monday 25 June 2012

house plans

Many people have asked about the status of our house plans. The plans have been completed and submitted to the municipality for approval so we are now in the waiting stage (but can call next week to hear if there are any problems). the preliminary date for getting approval is 8 weeks which puts us at the end of July/early august for an answer.

As this year is FLYING past and august will be here before we know it, I've been dreaming about how I want things to look and the beauty of the internet is that there are many ideas out there. I've been saving idea's to the computer (before I got Pinterest ) so unfortunately I don't know the sources to all these beautiful homes but if they belong to you please email me and I'll be happy to cite you as the source.

today's dreams : kitchens 

 I love the idea of building in the microwave! It saves having it sitting on the counter taking up valuable counter space and just looks more finished (in my opinion:) not hating on any microwaves on counters )

I LOVE these farmhouse sinks! I know they are super expensive but I still love them. (and on a side note: how awesome is that window!)

as you can see from the top few pictures white cabinets and wooden counters (along with the other elements I have already pointed out) are a recurring theme. I love the clean look of the white and the 'homey' feel of the wood. Unfortunately I have been told (by a couple of kitchen manufacturers here in Nam) because of the dry climate wood counters won't work cos they will absorb every little bit of liquid and warp very easily :(
but that doesn't stop me dreaming right?


 but I am willing to concede that even though my heart is loyal to the white cabinets , darker cabinets look awesome too!!


I have no idea what we'll end up getting (or be able to afford after researching all the options) but I'm leaning towards light and bright .
 I'll be back (eventually) with the final details


Monday 18 June 2012

Recovering the couch part 2

When I left you last week in our couch recovering adventure I was at the point of starting to cover pillows. I'm a very novice sewer who has some basic skills (i.e. I can thread a machine ,wind a bobbin and sew in a straight line). This was the biggest project I have ever done especially so far away from my Mom who is my usual trouble shooting person when I get crazy sewing ideas . (I'll admit to calling her a couple times throughout the process for advice!!)
when we left off the planning was looking a bit like this


I used the existing pillow cover as a rough guide to making a pattern . I cut around the existing case and then referenced back to it as to where the seams should be etc.. For the two bottom pillows I sewed two solid pieces together to make the covers reversible but for the top one I made an envelope back to allow the pillow to be removed in the future if I need too.
To do this I cut the back piece in half and hemmed them. As I don't have an overlocker I used a zig-zag stitch around the edges to prevent fraying( would recommend an overlocker/serger, this step took forever). I then hemmed it with a straight stitch.


I the laid the two pieces down and pinned on the connecting material.


i obviously then sewed this together :) I used the same method of zig-zag around the edges and a straight stitch after that to create a nice clean join.

I then joined the other side and turned the cover the right way round and put my pillows in.
My completed couch now looks like this 

yes I know the edges aren't all straight and I cut the covers a bit big in some of the areas but it really is a MASSIVE improvement :)
 
Before                                                                                         After

If you want more detailed instructions feels free to contact me directly.

*NEWS*
Please like Random Ramblings on Facebook 


Thursday 14 June 2012

Recovering the couch: Part 1


Way back in February I mentioned my plans for updating our guest room. I talked about our plans for finishing things of and our amazing score on fabric here . I eventually got Started to covering the couch about two weeks ago when we had a public holiday (and I bought a staple gun). I thought I'd share the process with you :)
the origional couch looked like this:

we inherited the couch from my aunt and we used it as our couch for a while before buying the daybed. It was a solid piece of furniture it just needed to be updated. Its been living in our spareroom as our 'Spare bed" as we needed a double bed in there for when people come visit :) Its been covered up under a sheet to make it blend in a bit more 

well to get started I removed the sheet and most of the pillows to plan my attack. I realised I could remove the inner mechanism which would make it easier to work with:


Once that was out there was a lot more space :)


the back pillows were originally attached to the chair. I cut them off to be able to use the existing covers to make a pattern.


I figured starting with the front panel would be the easiest so I draped the material over the piece I wanted to do and cut to size.I had lots of material and so probably wasn't as careful as I could have been in using materiel. I guessed for most of it. Measuring is probably a smarter way to go if you are tight on fabric.I also left the Original fabric in place an covered over it. You could take it off but I was lazy and I figured if I ever wanted to recover it again it might be good to have a 'professional guide' again.


then I pulled tight and started Stapling. No major instructions here. I found the wood and made sure my staples were in the frame. I did this for the front and the back. I decided to not reattach the pillows for two reasons:
1) the pillows sag in the middle if they are attached (see the top photo for evidence)
and 
2) I had no idea how to reattach them :)

at this stage it looked like this

I left flaps open at the back to hide the staples from the arm sections.


and simply kept pulling tight and stapling (technical I know )


Slicing your finger open is optional in this tutorial. It was ouwie!! 

our arm panels are curved and have a front panel that you can take off to hid the circler material under.


at this point I ran out of staples and as it was a public holiday the shops were closed and I had to wait till Saturday before I could carry on.
I used the existing covers to make patterns for the pillows

I'll finish my story in another post :)
its looking good and was surprisingly easy and physical. I had muscles hurting the next day I didn't know existed :)